How to Dictate Documents in Microsoft Word Using Voice Typing
The words we most want to hold on to are always the quickest to pass. Before you can organize your thoughts, before you begin to type, the next point is already gone.
When you try to listen and type at the same time, your brain is not truly doing both. It is switching between the two, fighting over the same limited well of attention.
The harder you try to capture every word, the less you actually understand.
In a conversation that mattered, in the years we spend learning, in our brief and hurried lives, how many words said once and only once will we go on missing?
The best solution is to take typing off your hands entirely. Microsoft Word has built-in voice input that lets you focus on listening and thinking, while it handles the writing.
This guide will walk you through using speech-to-text in Word, so that what your ears hear can become what your document keeps.
Why Use Speech to Text in Word
Before we dive into the steps, let’s explore why using speech-to-text in Word can be so beneficial:
- Hands-Free Writing: Ideal for those with physical limitations or anyone who prefers speaking over typing.
- Improved Productivity: Get your ideas down quickly without the need for typing, perfect for writing long documents.
- Multitasking: Dictate your thoughts while working on other tasks, increasing efficiency.
- Voice Commands: Control punctuation, formatting, and navigation with just your voice.
Method 1: Use Microsoft Word’s Built-In Dictate Feature
The most direct way to do voice typing in Word is to use Dictate, Microsoft’s built-in speech-to-text tool. Microsoft says Dictate works with a microphone and a reliable internet connection, and the Dictate button is available when you are signed in to Microsoft 365 on a mic-enabled device. The same basic workflow applies in Word for Microsoft 365 on Windows, Word for Microsoft 365 for Mac, and Word for the web.
How to Use Dictate in Word
- Open a new or existing document in Word.
- Go to the Home tab.
- Click Dictate.
- Wait for the Dictate button to turn on and start listening.
- Start speaking, and your words will appear on the page as text.
- When you are finished, click Dictate again to stop.
If you prefer to work in a browser, Word for the web uses the same basic flow. Open a document in Word for the web, go to Home, click Dictate, wait for Word to start listening, and then begin speaking. That makes the web version easy to use if you already store your files in OneDrive and want to work from a browser instead of the desktop app.
Using Voice Commands with Dictate
Dictate does more than turn speech into plain text. Microsoft also supports spoken commands for punctuation, editing, navigation, and formatting. For example, you can say “period” or “full stop” to insert a period, “comma” to insert a comma, and “new line” to move to the next line. You can also use commands such as “delete that,” “undo,” “select that,” and formatting commands like “bold,” “italicize,” or “create bullet list.” This makes Dictate useful not only for drafting, but also for cleaning up and formatting text as you go.
Method 2: Use Word’s Built-In Transcribe Tool
If you already have a recording, Dictate is not always the best tool, because Dictate is designed for live voice input. In that case, Microsoft’s Transcribe feature is the better built-in option. Microsoft explains that Transcribe can either record audio directly in Word and transcribe it in the background, or let you upload a pre-recorded file and turn it into text.
How to Upload Audio and Transcribe It in Word
- Sign in to Microsoft 365 in Microsoft Edge or Chrome.
- Open Word and go to Home > Dictate > Transcribe.
- In the Transcribe pane, select Upload audio.
- Choose your file. Microsoft says Transcribe currently supports .wav, .mp4, .m4a, and .mp3.
- Keep the Transcribe pane open while Word processes the file.
- When the transcript is ready, review it in the pane.
- Add the full transcript or selected sections into your document.
Microsoft also says the uploaded or recorded file is stored in the Transcribed Files folder in OneDrive, and the transcript stays attached to the document unless you remove it. You can edit transcript sections, relabel speakers, and insert either the whole transcript or only selected parts into the document. Microsoft currently allows Microsoft 365 subscribers to transcribe up to 300 minutes of uploaded audio per month.
Method 3: Use Windows Voice Typing
If you do not want to use Word’s built-in dictation engine, Windows offers another route. Microsoft’s Voice typing works across text fields on Windows 10 and Windows 11, so if your cursor is inside a Word document, Windows can type into Word for you even though you are not using Word’s Dictate button. Microsoft says this feature uses online speech recognition powered by Azure Speech services.
How to Use Windows Voice Typing in Word
- Open your Word document and place your cursor where you want the text to go.
- Make sure you are connected to the internet and that your microphone is working.
- Press Windows + H on your keyboard.
- Wait for the “Listening...” prompt before you start speaking.
- Speak clearly, and Windows will type into the active text field in Word.
- To stop, say “Stop listening” or click the microphone button in the voice typing menu.
Windows also supports voice commands while you dictate. Microsoft specifically notes commands such as “delete that” and “select that,” and it supports switching voice-typing languages by changing the current input language. That makes it a good alternative if you like working at the operating-system level rather than relying on Word’s own speech tool.
Method 4: Using Third-Party Tools
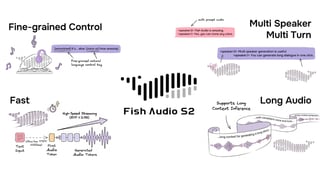
If your starting point is a recording rather than live dictation, a third-party transcription tool can be more practical than speaking directly into Word. Fish Audio is one example. Its Speech to Text service is built around uploading audio and getting back a transcript, so it fits best when you want to turn a meeting, interview, lecture, or podcast into editable text for Word. Fish Audio says its speech recognition supports English, Mandarin, Cantonese, Japanese, and Korean, and it can handle multilingual audio with code-switching automatically. It also says the tool is designed for long-form audio and supports major formats including MP3, WAV, FLAC, M4A, and OGG.
![]()
How to Use Fish Audio for a Word Workflow
- Go to Fish Audio and log in to your account.
- In your dashboard, click Speech to Text.
- Upload your audio file. Fish Audio’s web guide specifically lists MP3, WAV, and M4A in the quick-start flow.
- Click Transcribe.
- When the transcript is ready, copy the text.
- Paste it into your Word document and edit it there.
Fish Audio describes this as an upload-first transcription workflow, not a live microphone button inside Word. In other words, it is best for converting recorded audio into text first, then moving that text into Word for cleanup, formatting, and final editing.
Conclusion
If you want to speak and see text appear immediately inside the document, Word’s built-in Dictate is the most direct choice. If you already have a recording and want to stay inside Microsoft’s ecosystem, Transcribe in Word is the better built-in workflow. And if you are working with longer recordings and want an upload-based transcription tool, Fish Audio is a more natural fit.

Kyle is a Founding Engineer at Fish Audio and UC Berkeley Computer Scientist and Physicist. He builds scalable voice systems and grew Fish into the #1 global AI text-to-speech platform. Outside of startups, he has climbed 1345 trees so far around the Bay Area. Find his irresistibly clouty thoughts on X at @kile_sway.
Leer más de Kyle Cui